6 Steps to Grow your Email House List from 0 to 1000 Subscribers with AWeber
- Bootstrapping
- Customers
- Marketing
- Learning How to Sell
- Starting a Business
- Team
- Writing
- Workshop for Graphic Designers
6 Steps to Grow Your Email House List with Aweber
The Power of Marketing Automation
Own Your Marketing Platform: Build Your Marketing Engine
How and Why to Discover Your USP Unique Selling Proposition
Why Clickfunnels is so important for Creative Professionals
Sales Funnels How and Why to Get Into the Game
6 Steps to Grow your Email Subscribers with AWeber
Ping. Ping. Ping.
That’s the sound of your phone’s notifications hitting you all day long. While the mix of notifications varies, many of them are likely alerting you of incoming emails. Occasionally a small business owner discounts email because of this phenomena… surely a channel that is so heavily saturated can’t be effective.
 Wrong
Wrong
It is still the number one most effective marketing channel. Noah Kagan, Founder and CEO of AppSumo.com shared “AppSumo.com is a 7 figure business and 90%+ of our revenue comes from emails.” World renowned marketer and founder of KISSMetrics, Neil Patel, explains that “out of all the channels [he] tested as a marketer, email continually outperforms most of them”
In fact, 86% of consumers would like to receive promotional emails from companies they do business with at least once a month, and 60% would like emails at least weekly. It continues to be the number one method used by marketers for generating sales.
For this reason, we’ve created this 6 step guide to growing your company’s email list from zero to 1,000 subscribers using AWeber. As you are busy with your full-time gig and side venture we have broken this guide up into small, actionable sections that will help you fully leverage the power of AWeber in building one of your strongest marketing assets, your email subscriber list.
Step 1:Setting up AWeber the Right Way to Grow Your Email Subscribers
Over 100,000 small businesses and email marketers trust AWeber because it provides powerful tools that are also easy to get started with. That said, even with AWeber’s rich email sending platform there are still some things you need to know to get your email list from zero to 1,000 strong. While AWeber is an easy tool, there are four things you need to keep in mind when setting it up, to ensure you have the right footing to get to 1,000 subscribers:
1. Don’t spam
Over 100,000 small businesses and email marketers trust AWeber because it provides powerful tools that are also easy to get started with. That said, even with AWeber’s rich email sending platform there are still some things you need to know to get your email list from zero to 1,000 strong. While AWeber is an easy tool, there are four things you need to keep in mind when setting it up, to ensure you have the right footing to get to 1,000 subscribers:
Email service providers, such as AWeber, have a social and business responsibility to ensure that individuals using their services are not sending spam. On the social side, it’s annoying and harmful to marketing if people are spamming. On the business side, it’s dangerous to the reputation of an email sending provider if individuals using its servers are sending spam. Their servers will actually be marked as spammer servers, and that hurts all the other individuals using that company’s services.
Of the dozens of email sending providers out there, AWeber is one of the providers that takes this most seriously. Upon signup, you are shown a message that strongly prohibits emailing anyone that is not in your email list. As you use this powerful email solution you’ll see prompts throughout the process asking you to verify that you are not sending spam. In short, only add someone to your subscriber email list if you have their permission to do so.
 2. Make sure footer links look natural
You’ve likely seen it before: you receive an email from a sales person and it looks like it was hand typed and a custom message from a sales person. Then you scroll down and see an unsubscribe link in bright blue font at the bottom of the email. Your red flag alarms start blaring.
There is no better way to communicate that a message was sent by an automated process than using an unsubscribe link that looks unnatural. Instead, be sure to still use an unsubscribe link but embed it in the signature block so that it looks more natural and more likely to actually exist in a sales generated email.
The below example is a great example of an unsubscribe link done well, that makes the email look like it really was sent by a salesperson.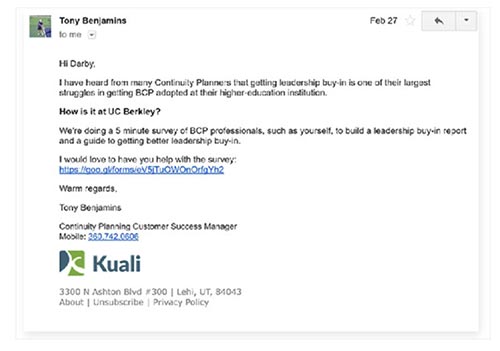
 3. Use double opt-in best practices
where needed
Depending on the country where your email subscribers live, you may need to be even more careful than just making sure the recipient requested your emails. You may actually need to double opt-in the individual. This means that you have sent the individual an auto-responder email asking them to click a link to confirm that they have signed up for your email. It can be annoying, but it increases the quality of your email list as those that do fully opt-in are seriously interested in receiving your emails.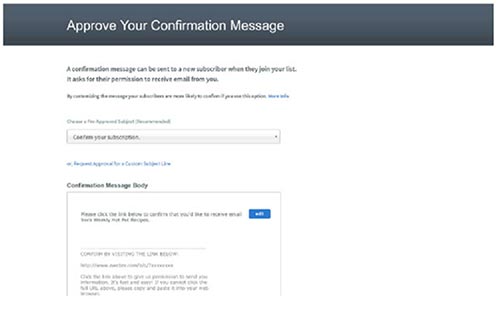
 Step 2: Correctly Leverage Sign-up Forms
After you get your AWeber account setup, you’ll likely want to have a way to get email list signups (since that is what this article is all about!). Thankfully, online sign-up forms have been around since the invent of the
Internet. Also, AWeber is a leader in email subscription sign-up tools, so they make it very easy.
In this step, you’ll learn how to use AWeber to set up your sign-up forms, and then we’ll review the best
practices you should use to ensure higher form view to completion conversions.
How to set them up
AWeber makes creating sign-up forms a true joy. It is easy, and their templates allow you to do it attractively.
Here’s how you can set up a sign-up form:
First, click on the “sign up forms” tab in the top menu and then click the big green button to get started.
Here’s where you’ll choose your template. If you don’t see a template you like, you can click “show more” to see more categories with the hundreds of different options that are available to you.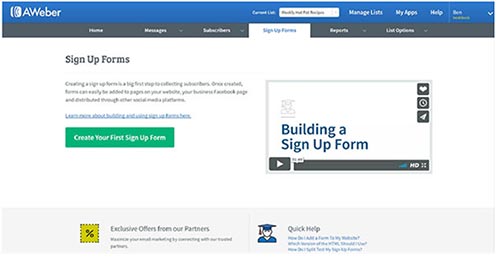
Here’s where you’ll choose your template. If you don’t see a template you like, you can click “show more” to see more categories with the hundreds of different options that are available to you.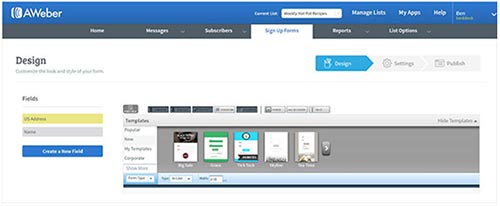
Choose your color scheme and then click on “load template.”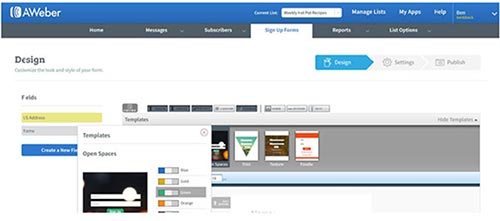
Click into the “Edit Header” section and change the test to something that will communicate what your site visitors will receive if they sign up.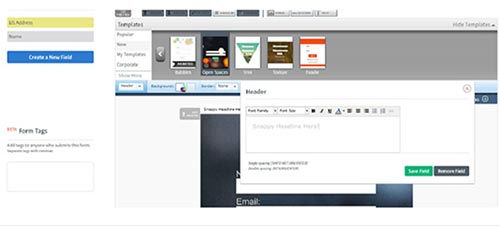
Click on “go to step 2” and complete the basic settings. This section is very self-explanatory. Select the thank you page where you want to send your new sign-ups. And then click “go to step 3.”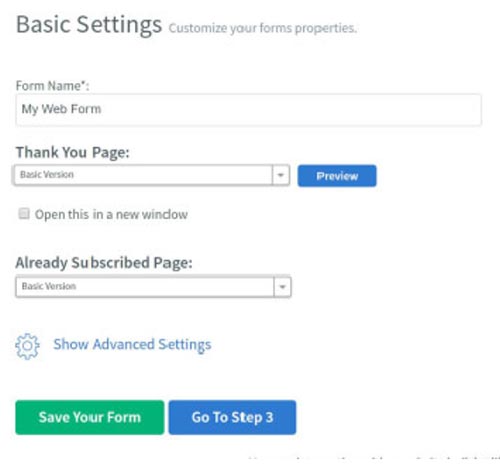
Publish away! You’ll be able to download the Javascript that can be embedded anywhere on your site. You may need a web-developer at this point, though if you’re using WordPress or other common website content management systems then there will be plugins you can download that will really help.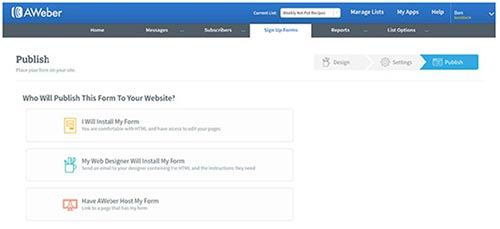
Best practices
The number one thing you can do to increase conversions on your email list signup form is to have fewer fields. By cutting out fields that aren’t absolutely necessary you can dramatically increase the percentage of people that come to your form and then go on to fill it out. Dozens of studies have been completed that show this: fewer fields get more conversions. In fact, in one study from the conversion rate optimization leader, Unbounce, a form with 11 fields was shortened down to one with just 4 fields, and they saw a dramatic 160% increase in the number of forms submitted.
While AWeber’s sign-up form builder is quite robust and handles most of the best practice for you, another area that falls on your shoulders is the need to truly sell your signup. You’ve likely been to a blog before and seen a module in the right sidebar that tells you “sign up for our newsletter.” The bad thing about that is that they don’t tell you why you should sign up.
Instead of simply telling someone what to do, be sure to include a reason. For example, instead, you can use a call to action such as “receive this ebook and get a weekly email packed with valuable tips to help you…” The difference between the first call-to-action and the second one, that has a real offer to it, will be that many more people seeing the second will complete your signup form and join your email list.
 Step 3: Grow Your List with
AWeber Integrations
As one of the most powerful email sending platforms, AWeber has dozens of powerful integrations with third party applications. While AWeber is very good at email and marketing communication, these third-party applications that tie into AWeber are focused in other areas of marketing: social media management, e-commerce, lead generation, advertising, customer relations and content management.
For example, with the Facebook integration, you can easily integrate your AWeber signup form with your Facebook page. This is ideal because your users can easily sign up for your email list without having to leave Facebook. With this integration, your signup form will have a dedicated tab on your Facebook page.
If you already have a LeadPages account for generating leads, you can easily tie in your AWeber forms to get more email signups. LeadPages is one of the most functional business landing page builder and getting AWeber onto your LeadPages is a powerful match.signups. LeadPages is one of the most functional
business landing page builder and getting AWeber onto your LeadPages is a powerful match.
If you are one of the few hundred thousand small business owners that is taking payments through PayPal, then you may want to leverage the AWeber integration here. You can sync your AWeber account with PayPal so that anyone who purchases from you will automatically be invited to sign up for your email list.
Running social promotions on Facebook and Twitter are two mechanisms that small companies see a lot of success with. Gleam, a leader in social promotions, allows you to easily setup and run competitions and rewards giveaways. With the Gleam and AWeber integration you can tie them together and sync your Gleam users into your AWeber email lists for continued marketing.
Facebook has a new(ish) advertising format where you can show Facebook mobile users a lead form. Through this advertising format you can offer an ebook download, webinar signup, etc… in a form that is native to Facebook and pre-populates the signup fields with their Facebook user detail. When they complete this Facebook Lead Ad format, the data normally is just stored in Facebook. However, through a Zapier integration, you can easily tie Facebook Lead Ads into AWeber so that all your signups in Facebook also live in your AWeber marketing instance.
If you are an Etsy shop owner, you can easily connect your AWeber account to Etsy to get products into AWeber. This ingenious integration enables you to drag and drop your products and descriptions that are in Etsy straight into the email builder in AWeber. You can also auto-sync over your Etsy buyers into AWeber’s subscriber lists.
Unbounce, an A/B testing tool that helps you easily build and test landing pages, can pull in AWeber forms so you can easily get your landing page visitors into your AWeber subscriber lists.
How to install these AWeber integrations?
AWeber knows that installing complex integrations can take weeks if you need to hire a developer to help you get it done. So, they’ve set up their integration platform so that it is as easy as clicking a few buttons and putting in a little bit of information to set them up. Here’s an example of how you would set up the Facebook Integration:
Click on the “My Apps” link in the top menu navigation.![]()
Click on the application you want to install.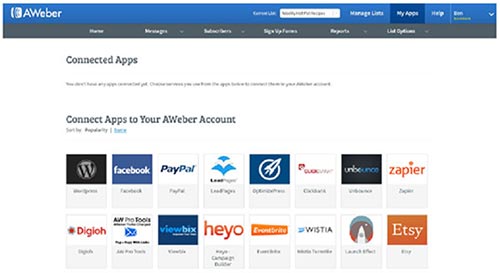
Click the enable button
Now you’ll be taken to the other tool where you’ll be led through the process. For example, with Zapier it takes you to the specific “Zap” that you can easily setup. Zapier directs you through the process and helps you finish the integration very easily.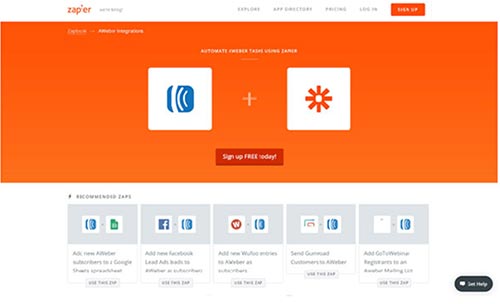
 Step 4: Segment for More Affordable Growth
Email marketing is great at sending out messages to massive groups of people. Doing so takes little to no time at all. Sending emails has been one of the pillars of the Internet since it’s inception. However, the ability to send smart emails, that are well targeted to specific segments in your subscriber list, has only existed for the last few years. Over these years, AWeber has continuously innovated in its segmentation offering.
AWeber segmentation gives you the ability to break your list of subscribers into smaller subsets of people with similar interests or behaviors.
Setting up these segments is a simple process with AWeber.
To get started, first navigate to your subscriber management section of AWeber. To do this click on the
“Manage Subscribers” menu option under the “Subscribers” tab in the top navigation menu.
Pull up the search page and use the “Select Field” drop down menu to select the criteria you want to use in building your segment. For example, you can use the “message opened” criteria to determine if a subscriber opened a specific email, or “page visited” to find people that visited a specific page. If you want to add more criteria logic you can simply click the green plus sign next to your first criteria.
Once you’ve selected all the search criteria logic, click on the “Search” button. This will pull up your list of search results. From here, you can save the subscribers as a new segment. Give the segment a name and click “Save” to store this list in your AWeber segments.
Once you’ve got this segment built you can view the segment easily from the left side of your “Manage
Subscribers” page, or easily send emails to that segment from your email broadcasting section of AWeber.
Several important segments you’ll want to set up for your email subscriber list are:
Segments separating your customers from your non-customers or prospects
Identify who your advocates are based on heavy interaction (high open rates and click-through rates)
Segment out individuals who have not been engaging with your emails so you can stop sending
to them, or potentially reach out through another means (such as a phone call, direct mail, or carrier pigeon)
Separate your subscribers into different segments based on the types of products they’ve purchased from you
 Step 5: Automate your Processes
Running a small business, especially when you’re driving the growth by yourself, is a big task. AWeber has done a fabulous job of building out email automation campaigns that help you engage subscribers, get email subscriber referrals, boost your sales and take back the time you need to drive your business towards success.
Inside AWeber you can set up a simple sequence of emails that helps you shift your business into overdrive. Sequence emails, often called drip campaigns, slowly release content to your audience at pre-determined intervals, to help them more fully engage with you and increase the likelihood that they’ll purchase from you.
As you can see from the below sequence of screenshots, building your own automated email drip campaign is point-and-click easy, and very self-explanatory.
First, navigate to the campaign builder in the main navigation.
Click “Create Campaign” and give your campaign a name.
Set your trigger. This is often a simple “on subscribe” trigger that puts your new subscribers into a drip campaign.
Select your first email to go out. You simply drag and drop the email option onto the workflow and then select the email you’ve already written (or create a new one)!
Select the second message to go out.
 Step 6: Leverage the Power of
Facebook and AWeber
As discussed in an earlier step, you can easily integrate AWeber and Facebook in order to get subscribers into your AWeber system. That integration alone will save you countless hours having to run exports from Facebook, open the export in Excel and change data columns, and then re-import into AWeber.
This integration is seen as a common marketing process improvement, but one that is not widely used at all is leveraging AWeber’s powerful segmentation features in order to build custom audiences in Facebook.
Facebook has some very powerful segmentation capabilities, in large part because of all the details that Facebook users share with friends via the Facebook platform. For example, within Facebook’s advertising platform you can create segments of Facebook users you’d like to advertise to based on gender, income, hobbies, home ownership status, etc.
Select the second message to go out.
While segmenting in AWeber isn’t that powerful, simply because you don’t have all that information on your subscriber base, you can leverage AWeber and Facebook in a unique way. With Facebook you can build a “custom audience” whereby you upload a list of email addresses from your subscriber list and Facebook will try to match those email addresses to their Facebook user list. Anyone that is on Facebook and using the same email address as what they’ve provided you through AWeber will now be in a custom audience you can advertise to. This is great because it allows you to target individuals from your list based on criteria you know about them: purchasers vs non-purchasers, product line interest, sales region, etc.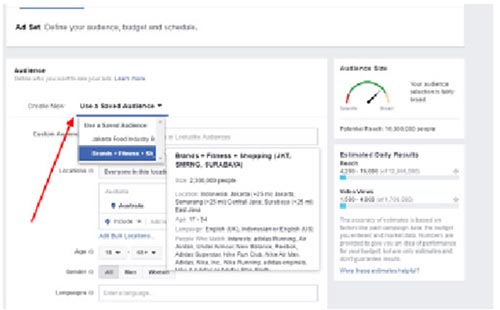
Facebook custom audiences let you take it a step further: you can mix your own custom audience that you’ve uploaded to Facebook with their own targeting criteria discussed earlier.
Additionally, you can use the Facebook advertising platform to create lookalike audiences to expand your custom audience list to a wider audience. Facebook will look at characteristics of users within your uploaded list and then look for similar Facebook users to share your message with.
Win the Race
By now you’ve got a strong understanding of how AWeber can help you get ahead in the small business race. You’ve got the starting skills needed to build your list from zero to 1,000 in short order. You are well on your way to being the next Jeff Gordon or Mario Andretti in your businesses industry.
Simply because you’ve got a good start, though, doesn’t mean you can rest on your laurels. One key lesson that you must remember, which is vital to your success as a small business owner and master marketer, is to continually challenge your assumptions, test those assumptions, and iteratively improve the processes you’re using to connect with new buyers.
For example, we’ve shared with you six steps you should follow in getting your email house list from zero to 1,000. While you’ll find some good success with just these six steps, you won’t be able to fully win unless you keep improving and trying new things.
Thankfully, AWeber is continually iterating with their tool, releasing new functionality all the time, to help you win the small business race.
 Author: Ben Beck
Despite his near addiction to tech and marketing, he also loves to get away from it all and spend time in the mountains hiking, rock-climbing and cycling with his wife and two boys.
Ben loves working at the intersection of technology and marketing. From his early youth selling discount candy from his locker to building his own text message marketing tool that he sold to the State of Utah he has learned the value of entrepreneurial thinking and smarter marketing. His current marketing consulting services focus around marketing automation systems and building chatbots for marketing purposes. Ben is certified on a breadth of marketing tools, such as Adwords, SalesForce, Adobe Analytics, Marketo, and Hubspot and expert level on dozens of others, such as AWeber, GetResponse, Domo, Optimizely and Hootsuite. He is currently building a course specifically tailored to teaching marketers how they can use chatbots for lead generation purposes.
Disclosure: I am an independent ClickFunnels Affiliate, not an employee. I receive referral payments from ClickFunnels. The opinions expressed here are my own and are not official statements of ClickFunnels or its parent company, Etison LLC.

 2. Make sure footer links look natural
 3. Use double opt-in best practices
 Step 2: Correctly Leverage Sign-up Forms
 Step 3: Grow Your List with
 Step 4: Segment for More Affordable Growth
 Step 5: Automate your Processes
 Step 6: Leverage the Power of
 Author: Ben Beck